I made a very delicious dessert tonight. I have a lot of apples that are going to go bad if not eaten soon. So I looked up a recipe for an apple dessert and it was the best. We have some left over for tomorrow too. It went really good with Rog's chile.
I finally got outside today and got my picnic table flower arrangement finished. After going through the steps for this blog I discovered that all I did was paint the base. So I guess we got it done today LOL
First Rog cut a piece of wood for me to use as a base to hold the flower pot and all on the table. It needs this extra support since it is outside in the breezes. I am painting it hunter green because it matches the table cloth and because we have a can of that color.
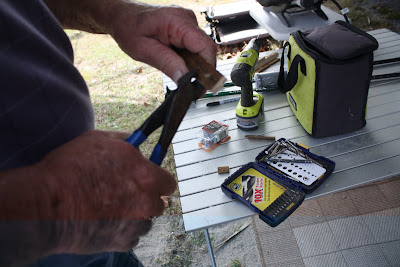
Rog did purchase a nice shiny new bolt and washer, but does not remember where he put it so he is using a piece of scrap wood for the washer and a small screw for the bolt. Here he is cutting the piece of wood that will be used for the washer.
Here is the nice not so shiny washer and shiny screw.
Here he is marking up my beautifully painted wooden base. He is finding the center so he can place the pot correctly. This is one place where geometry is used in case you wanted to let anyone know that you do use it after school. LOL
He is placing the wooden washer/screw in the bottom of the flower pot. In the bottom of the flower pot is a hole that is used to let the water from the plant out. But since my flowers are not real I do not need that hole. I do need to secure the pot to the wooden base.
He is now using his power screwdriver to secure the flower pot to the wooden base.
Everything is secured and ready for the next step.
Here Rog is cutting the plastic flower stem shorter so it will fit in the flower pot correctly.

Done. I am going to get some greenery and place it near the base of the plant stems to fill in more.
This little guy was always by making sure we did everything right.

I am getting to that age, but very afraid of that spinning action. LOL
Another one of those geometry problems
I finally got outside today and got my picnic table flower arrangement finished. After going through the steps for this blog I discovered that all I did was paint the base. So I guess we got it done today LOL
First Rog cut a piece of wood for me to use as a base to hold the flower pot and all on the table. It needs this extra support since it is outside in the breezes. I am painting it hunter green because it matches the table cloth and because we have a can of that color.
Rog did purchase a nice shiny new bolt and washer, but does not remember where he put it so he is using a piece of scrap wood for the washer and a small screw for the bolt. Here he is cutting the piece of wood that will be used for the washer.
Here is the nice not so shiny washer and shiny screw.
Here he is marking up my beautifully painted wooden base. He is finding the center so he can place the pot correctly. This is one place where geometry is used in case you wanted to let anyone know that you do use it after school. LOL
He is placing the wooden washer/screw in the bottom of the flower pot. In the bottom of the flower pot is a hole that is used to let the water from the plant out. But since my flowers are not real I do not need that hole. I do need to secure the pot to the wooden base.
He is now using his power screwdriver to secure the flower pot to the wooden base.
Everything is secured and ready for the next step.
 |
| Now that the flower pot is secure we place a piece of Styrofoam inside the flower pot to make it look pretty and to hold the flowers in place. |
Here Rog is cutting the plastic flower stem shorter so it will fit in the flower pot correctly.

Done. I am going to get some greenery and place it near the base of the plant stems to fill in more.
This little guy was always by making sure we did everything right.

I am getting to that age, but very afraid of that spinning action. LOL
Another one of those geometry problems


No comments:
Post a Comment